Unlike in previous on-prem versions, SharePoint Online does not offer the functionality to save an existing site as a template on which newly provisioned sites can be based. At least, not without the use of PowerShell. The current offering for custom site templates has limited configuration options that don’t include web parts and pages.
Saving a site as a template can be a powerful way to streamline provisioning, standardize site structures, and accelerate collaboration. But did you know that it can also play a role in optimizing your SharePoint storage?
In this guide, we’ll walk you through how to save a site as a template in SharePoint Online, and explore how smart use of templates can help reduce unnecessary storage consumption across your Microsoft 365 environment.
Why Save a SharePoint Site as a Template?
Site templates allow you to replicate the structure, libraries, lists, workflows, branding, and even content of an existing site. This is especially useful when:
- You need to create multiple project or team sites with similar configurations.
- You want to enforce governance and consistency across departments.
- You’re looking to reduce manual setup time and errors.
But beyond productivity, templates can also help you manage storage more efficiently.
How Templates Support Storage Optimization
While templates themselves don’t directly reduce storage, they can help prevent unnecessary storage growth in several ways:
1. Avoiding Redundant Content
When teams manually create new sites, they often copy and paste content, documents, or lists from existing sites. This leads to duplication and bloated storage. Templates eliminate this by providing a clean, pre-configured structure - without the need to duplicate files.
2. Enforcing Lean Site Design
By designing templates with storage in mind, you can:
- Limit the number of default document libraries or lists.
- Set versioning limits (e.g., retain only the last 10 versions).
- Exclude unnecessary web parts or apps that generate hidden storage (like unused workflows or forms).
- Pre-configure retention policies or lifecycle rules.
This ensures that every new site starts lean and stays manageable.
3. Promoting Lifecycle Awareness
Templates can include guidance or automation for archiving, retention, or deletion policies. For example, you might include a “Site Lifecycle” list or a Power Automate flow that reminds owners to review content after 6 months. This proactive approach helps reduce stale content and keeps your storage footprint under control.
How to save a site as a template in SharePoint Online
Requirements
Roles & Licensing
- SharePoint Administrator role – To enable setting org-wide settings via PowerShell and via the SharePoint admin center.
- M365 Business or Enterprise License – Any Microsoft Business or Enterprise license that includes SharePoint P1 or P2.
Apps & Modules – Update setting via PowerShell
- PowerShell – There are several versions and ways to access PowerShell, in our guide we will use PowerShell ISE.
- PnP PowerShell module – This module is used to create the site templates and provision the templates.
- Authentication – In all our scripts, we use PnP PowerShell Interactive Authentication. If you need help setting this up refer to our guide: How to connect to PnP Online with Interactive Authentication
Preparation - Create a template source site
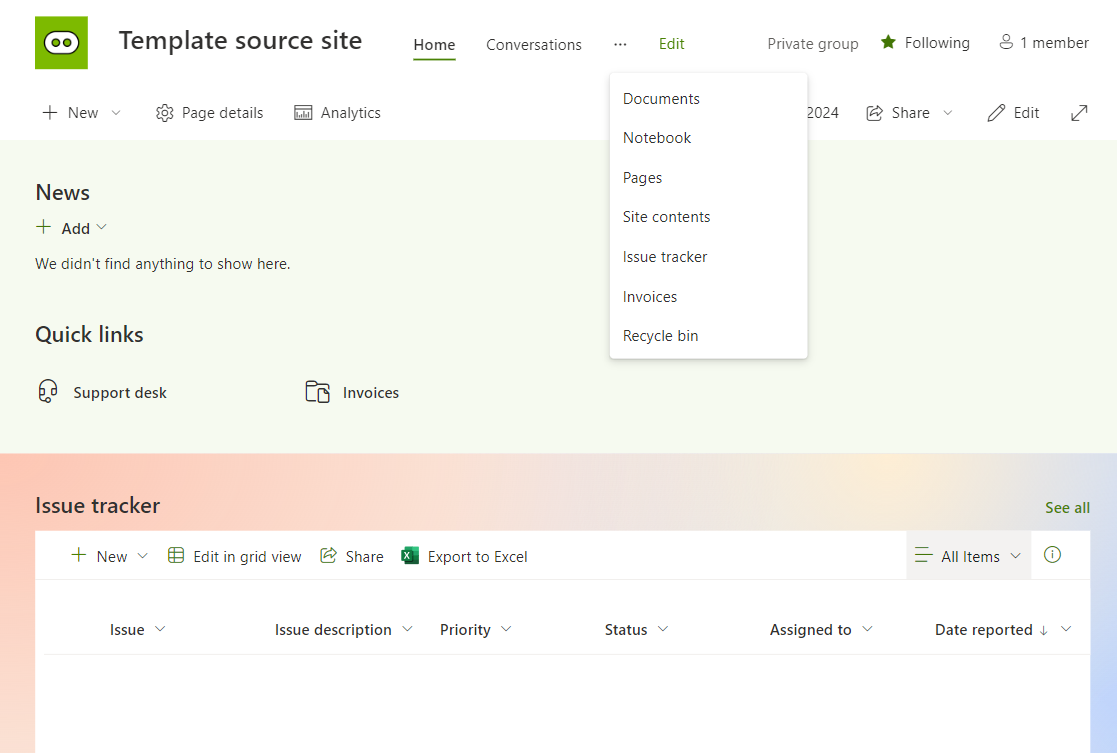
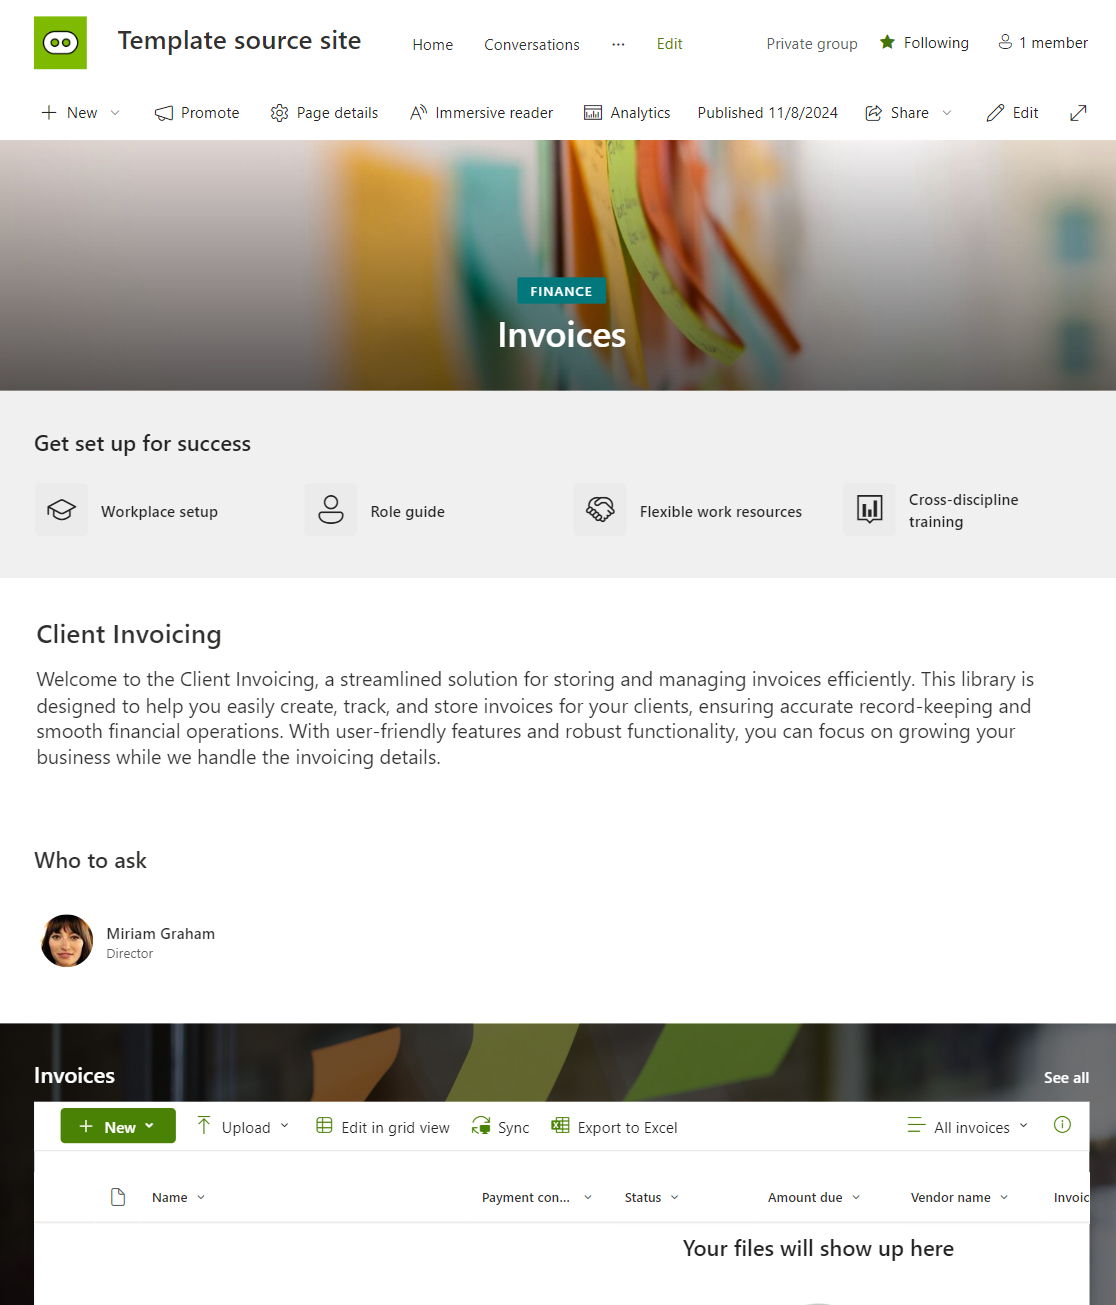
All three methods discussed in this article require a template source site to be built and configured before you can create the template itself. For illustrative purposes, we created a standard blank team site and customized it to serve as our template source by changing the following things:
- The Issue Tracker list template from Microsoft has been added.
- The Invoices document library template from Microsoft has been added.
- The Homepage has been customized with quick links and a section has been added for the list web part to display the issue tracker.
- An ‘Invoices’ page has been created with quick links, a short intro and the document library web part for the Invoices library.
- The navigation has been customized to display horizontally instead of vertically.
Homepage, navigation, and issue tracker:
Invoices page and library:
Be sure to save the URL of your template source site so you can reference it in the steps below.
Method 1 – Custom SharePoint site design
This method entails using an existing site to create a site design which defines lists, branding, themes, and navigation links. You then make these configurations available in the form of a static template for users to apply when creating new sites or updating existing ones.
Step 1 - Create a site design
To make templates available to users when creating new sites or updating existing ones, you will need to create what is referred to as a site design. The site design will display in the UI under “Select a template” (very confusing that the terms are different, we know!) when creating a new site. Once you have installed the PnP PowerShell module, you can complete the following steps:
Step 1.1 – Create the site schema and script
You can either manually create the site script or extract one from an existing, pre-configured site. In the example below, we will be extracting the site script from the existing template source site we created earlier:
Connect-PnPOnline -Url <Template site URL> -Interactive -ClientId <Client ID>
$SiteSchema = Get-PnPSiteScriptFromWeb -IncludeAllLists -IncludeBranding -IncludeTheme -IncludeSiteExternalSharingCapability -IncludeLinksToExportedItems -IncludeRegionalSettings
$SiteScript = Add-PnPSiteScript -Title “Template source site” -Content $SiteSchema
Step 1.2 – Create a site design
We can now create a site design that can be made available to users:
$siteDesign = Add-PnPSiteDesign -Title "Organization Template Team" -SiteScriptIds $SiteScript.Id -Description "template source site" -WebTemplate TeamSiteLink to full script: Create a SharePoint site Design
Step 2 – Use the site design to create a new site
To create a new site based on the design:
- Navigate to the SharePoint Home Site.
- Select ‘Create site’ in the top left-hand corner.
- Select ‘Team site’.
- Navigate to the ‘From your organization' tab.
- Select the site design you have created in the previous steps.
- Once you have reviewed what the design changes on your site, select ‘Use template’.
- Name your site.
- Once the details are validated by SharePoint, select ‘Next’.
- Confirm the privacy and language settings for the site and then select ‘Create site’.
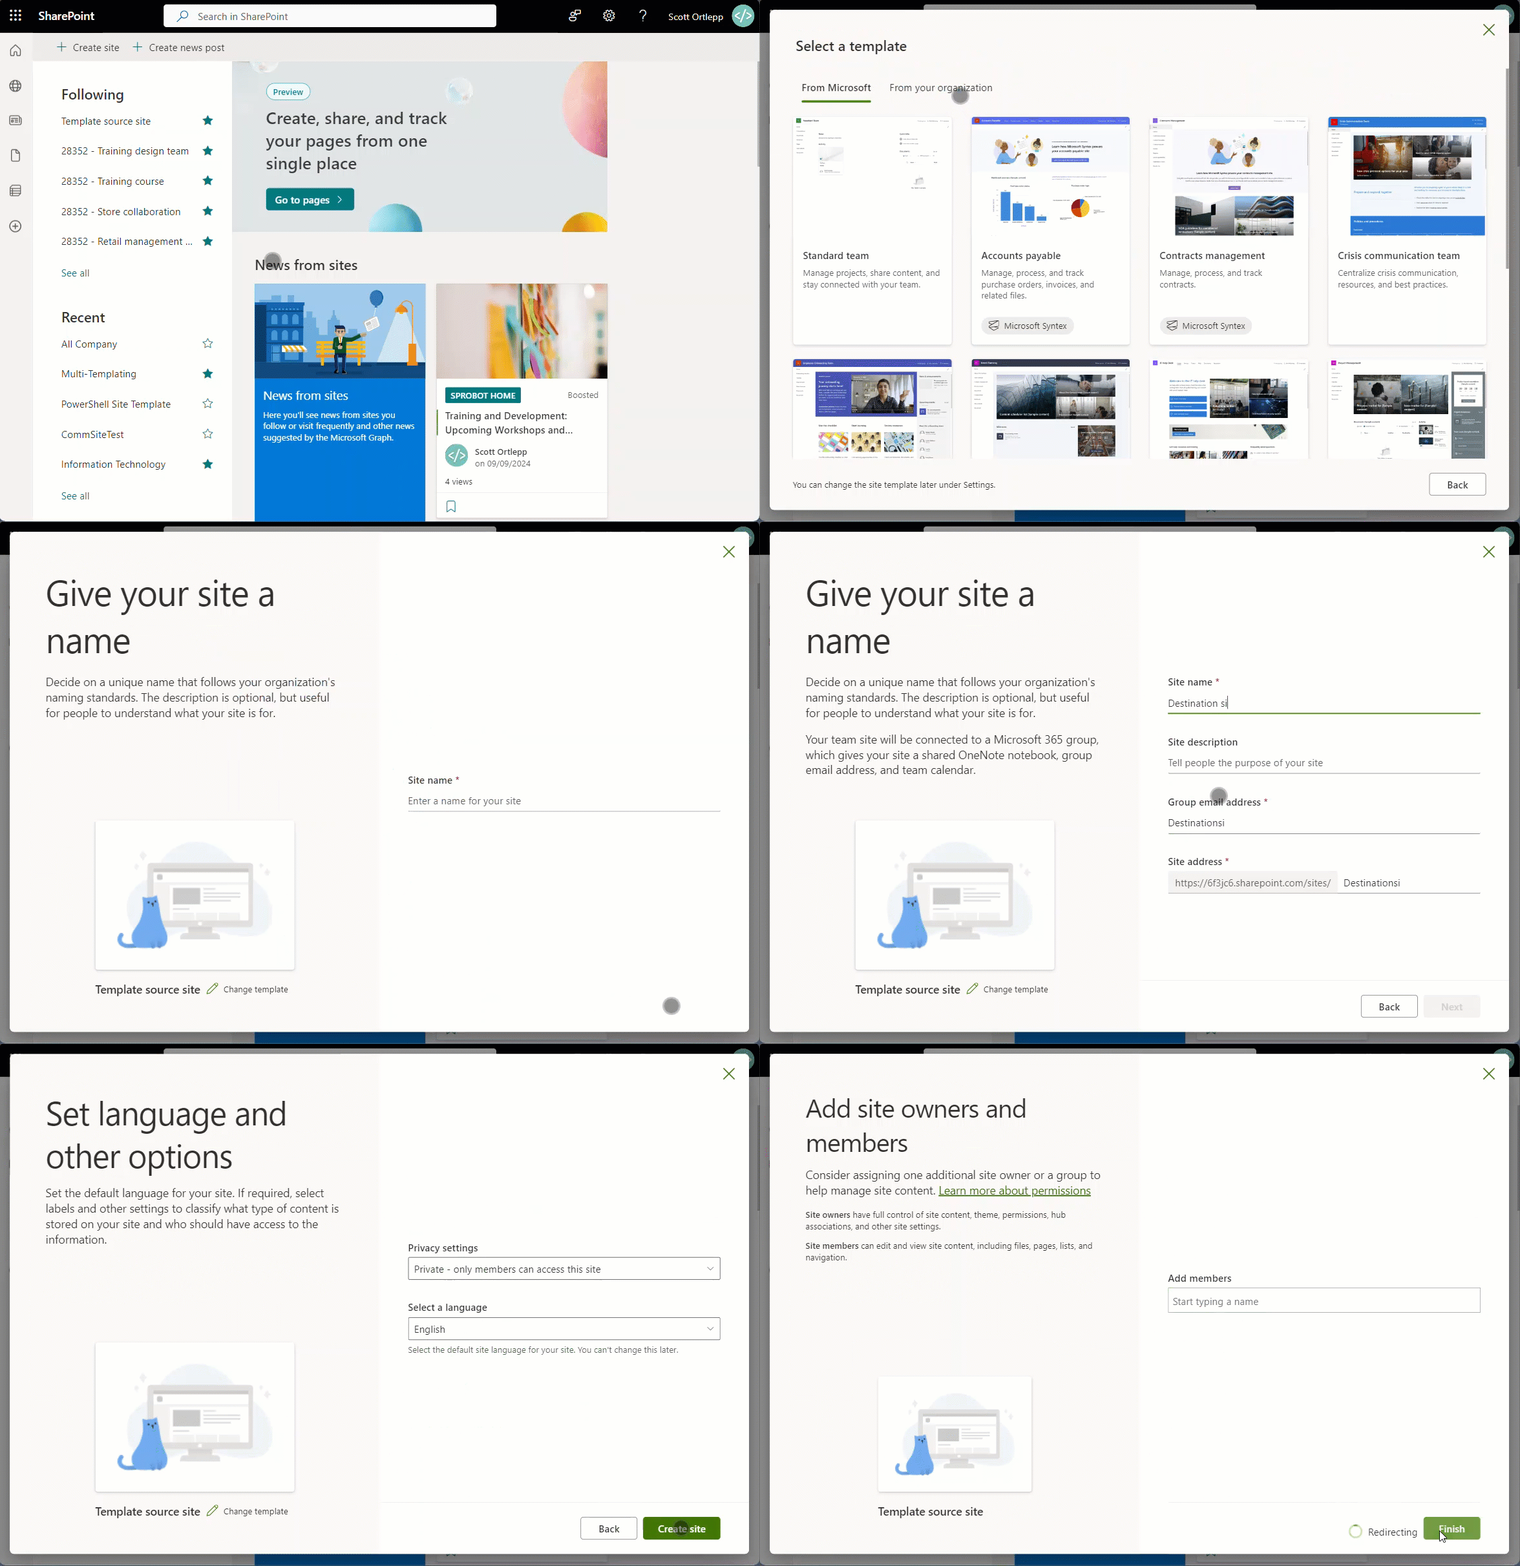
Once you have completed these steps, a new site will be created and SharePoint will start to apply the design (what we’re generally referring to as a template) to your site. Depending on the complexity of your design, this can take up to 10 minutes.
Here is what our newly created site based on the design (again, template!) we selected looks like:
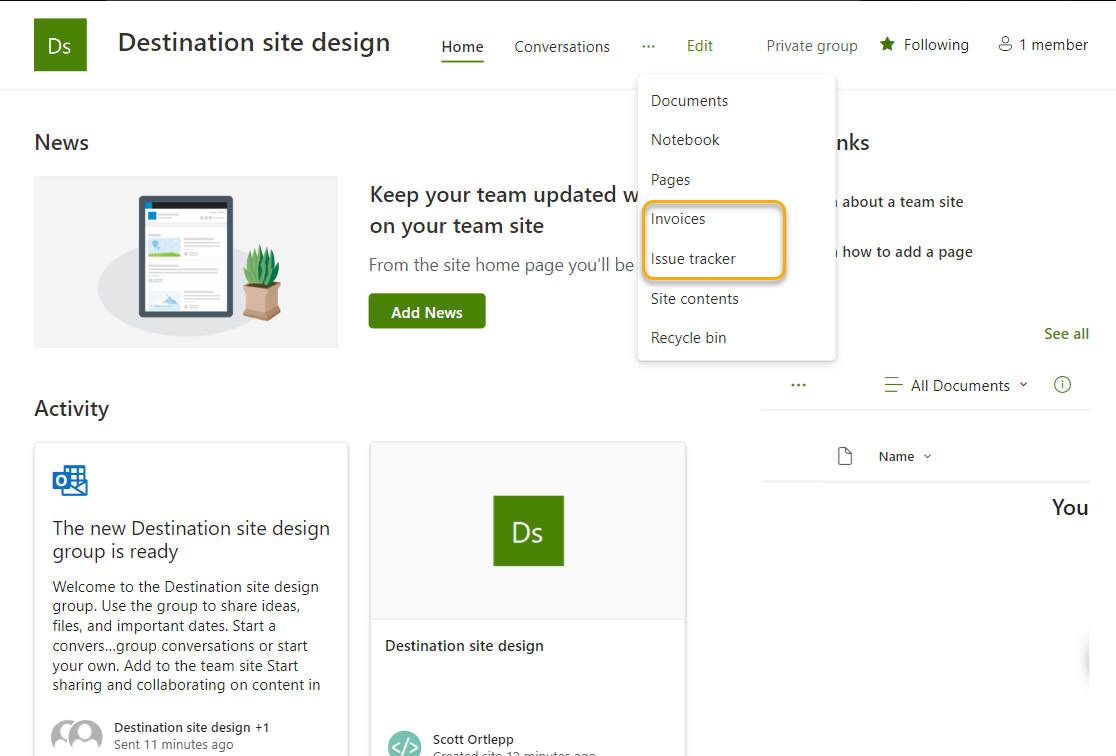
To learn more about creating custom SharePoint site templates, refer to the Microsoft documentation: Get started creating SharePoint site templates and site scripts | Microsoft Learn.
Advantages
- User Accessibility – Users can easily access published templates either during or after the site creation process.
Limitations
- Pages and web parts - Custom templates currently do not support web parts and pages. This means that once your template has been applied to the required site, it will still have the standard homepage.
- Updating designs – Updating designs requires the updating of the template site, site schema and site script before updating the design.
Method 2 – PowerShell site template
PowerShell site templates enable you extract the configuration of an existing SharePoint site to an XML file, and then apply this configuration to your desired destination site. This includes lists, branding, themes, navigation links, pages, and web parts.
Step 1 - Create a PowerShell site template
Once you have installed the PnP PowerShell module, you can connect to the site and then use the Get-PnPSiteTemplate command to export the site template:
Connect-PnPOnline -Url <Template site URL> -Interactive -ClientId XXXXXXXX-XXXX-XXXX-XXXX-XXXXXXXXXXXX
Get-PnPSiteTemplate -PersistBrandingFiles -PersistPublishingFiles -IncludeAllPages -IncludeHiddenLists -Out .\PSSiteTemplate.xml
This will create an XML file on your desktop that is used when applying the template to the target site(s).
Step 2 – Apply a site template to an existing site
Step 2.1 Connect to the target site and enable scripting
To enable the target site to have a site template applied, scripting must be turned on:
Connect-PnPOnline -Url <Target site URL> -Interactive -ClientId XXXXXXXX-XXXX-XXXX-XXXX-XXXXXXXXXXXX
Set-PnPSite -NoScriptSite $false
If scripting is not enabled, applying the template will fail.
Step 2.2 Apply the template
Whilst still connected to the target site, apply the template:
Invoke-PnPSiteTemplate -ClearNavigation -Path .\PSSiteTemplate.xml Once completed, the target site will have all the specified elements from the template applied to it.
Link to full script: Create a SharePoint Site Template
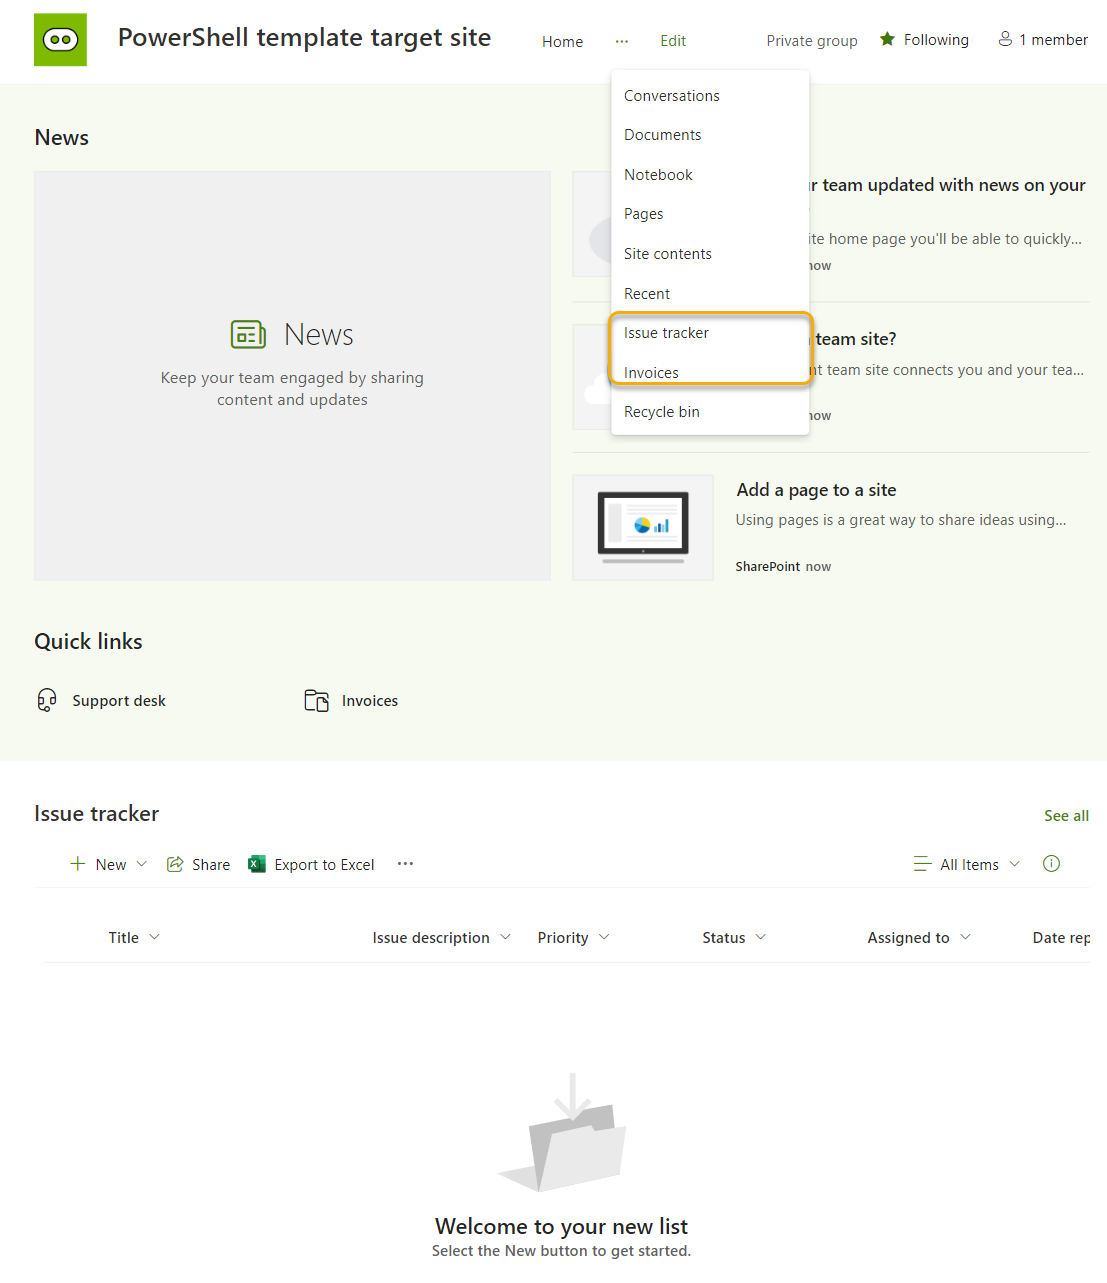
To learn more about PowerShell site templates and the elements that can be included, refer to the Microsoft documentation: Get-PnPSiteTemplate | PnP PowerShell.
Advantages
- Template configuration – PowerShell site templates allow for more granular level of control over what is included or excluded.
- Pages & Page Content – Pages and the page content is included in the template.
Limitations
- Admin effort – Each time a new or existing site needs a template to be applied, an admin will need to run the script to both create a new custom site template XML file *and* then also apply this XML file to the destination site.
- Time to apply – Depending on the complexity of the template, the relatively simple steps to get and apply a template can take a long time to complete.
- Section backgrounds – Section background images are not included.
- Finicky functionality - Some page and list configurations are not supported by PnP and will fail, sometimes with a useful error message, but sometimes just with a generic error like "Access denied".


